| Harry/Modeling | ||
Project: HarryIn this tutorial, we will model, texture and animate a funny little character called Harry. The tutorial is a complete example and includes all usual steps of making an animation. Although the subject is quite advanced, the workflow is described in detail. Even new users who are already familiar with 3D graphics can try out this tutorial. If you find a certain part of the tutorial difficult, you should examine other beginner level tutorials of the same issue and continue again with improved skills.
Tutorial level: Advanced
Modeling the BodyThe model will be built using subdivision surface modeling. This technique allows stepwise refinement of a rough control cage into a detailed model. It is a very powerful way to build organic freeform shapes. First some terminology: the left mouse button will be abbreviated as LMB, the right button as RMB. Moving the mouse while holding a mouse button down is called dragging. 'Click' means LMB click unless specified otherwise. Similarly, dragging means LMB dragging. Start Realsoft 3D. You may close the animation bar on the bottom of the screen by hitting the function key F7. This maximizes working space on the view window. The initial control cage for Harry's body is a simple cube. Switch to the leftmost tab (SDS) of the toolbar. Click on the Cube button to activate the SDS cube tool.
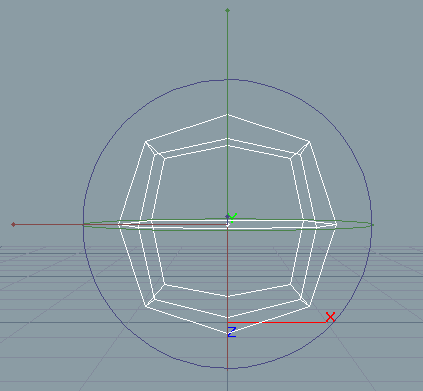
Move the mouse over the blue View window. Click once to define one corner of the cube. Press Shift key down to force a symmetric shape (width=height=depth) and move the mouse diagonally away from the first point. When you see a shape that has a suitable size for the body, click second time. The simple, somewhat rounded shape is the surface generated by a cube like control cage.
Let's modify our modeling environment a bit. To get a shaded real time view of the shape, click the OpenGL rendering icon. It is the third icon from the bottom in the vertical view control bar, located at the right side of the view.
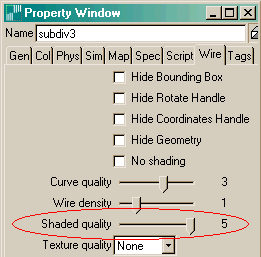
The shaded SDS object may look a bit blocky. To see the actual smooth surface better, double click the object name 'subdivXX' on the leftmost Select window. A quick double click opens the object property sheet (you can also hit a lowercase 'p' hotkey). Switch to the 'Wire' tab of the opened window. There you can find a slider 'Shaded Quality'. Set it to value 4 or 5, and then close the property window.
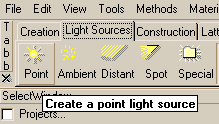
In shaded OpenGL modeling, light sources usually help to visualize the shape. Let's add one. Zoom out the view window a bit by holding down both the Shift key and the right mouse button and by moving the mouse downwards. You will now see a larger area of space. Similarly, RMB dragging with Alt rotates the view, and RMB with Ctrl key pans the view. Fluent space navigation is an important part of modeling in every 3D software package, so it might be a good idea to practice these controls until you feel comfortable with them. If you get lost in space, just hit the blue 'N' icon in the view control bar. It brings you back to the front view towards space origin. Then back to the light source issue: the toolbar on the top includes a tab called 'Light Sources'. Bring it to the front. Click the 'Point' light icon. Then click on the view window, for example on the top left corner. Move the mouse a bit and click second time to finish the tool.
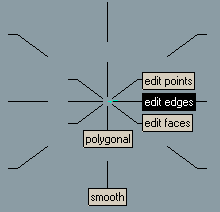
After these preliminary steps, we can start the actual control cage editing. Select the SDS object, which we created above, from the leftmost select window by clicking its name (SubdivXX). We can quickly set the object into so-called edit modes using the View window's compass menu. So, move the mouse over the View window, press the right mouse button down and move the mouse. This opens the context sensitive compass menu. When a SDS object is selected, the compass includes among other things 3 edit modes: edit points, edit edges and edit faces. Move the mouse to the right until 'edit edges' becomes highlighted. Then release the right mouse button.
The idea behind the compass menu is that, because it is based on clearly distinctive directions and distances, your hand can learn the selections and make them very quickly. There's no need to aim slowly and precisely. Now the SDS object is in edge edit state. You can see its control cage as a wire frame around the shaded surface. If you move the pointer over the shape, you can see how edge handles become highlighted. Select all edge handles by pressing LMB down and dragging a selection box around the whole SDS object. Selected edges display a blue edge normal handle line. Make sure all the edges are selected. If not, you can add them to selection by Shift clicking them one by one.
Press the Ctrl key down. Move the pointer over a red knob at the outer end of one of the blue edge normal handles. Press LMB down and drag the knob outwards, Ctrl held down. Ctrl dragging an end knob performs the edge bevel operation. Release the LMB when the bevels cut the object into equally sized parts as shown in the figure below.
Note: if the operation fails (not all edges were selected etc.), just apply Undo (Ctrl-z) to step back in modeling history. Now switch to 'Edit Faces' mode; you can do this with the compass menu. Rotate the view (Alt+ RMB drag) so that you see the object from below. Note that the grid on the ground plane helps to visualize rotations. Select a face at the bottom left side by clicking it. This face will be the starting point of a leg.
Press the Alt key down, move the mouse over the bottom edge of the selected face and LMB drag. This activates rotation of the face around the edge. When the face is fully horizontal, release LMB.
Click the face at the bottom right side to change the face handle selection and rotate it to the horizontal plane, too. Then, press the Shift key down and click the face, which you already rotated. Shift clicking does multi-selection and now you have both faces selected. If you accidentally select wrong faces, you can Alt click them to deselect. As already indicated, we will 'branch out' two legs from these faces. Before doing that, you may decrease the size of the faces slightly, to make the leg diameter smaller. This happens by LMB dragging the end knob of either of the face normal handles. Note that if you hit a wrong handle, just hit esc key to cancel, or Undo (Ctrl z) afterwards. You may also move the faces closer to each other, by dragging an appropriate face edge. This moves the face in the edge direction. After these adjustments, make sure both faces are selected.
At this point, it is a good idea to save the project. Undo has a limited depth, and you may later want to reload a certain work phase. So, select 'File/Save As' from the pull down menu, type in a file name and hit OK to save. Remember to repeat saving at regular intervals. It is also a good idea to change the file name occasionally so that you will get several backup versions: harry1, harry2, ... etc. Now we start leg branching. Press Ctrl key down and LMB-drag either of the blue face normal handles from the middle of the line downwards. Two extrusions appear. Leave the first extrusion quite short, so that there will be enough geometry detail to allow leg bending at pelvis area. Release LMB to finish extrusion. Then drag an outer end knob of a blue normal handle line to shrink the leg diameter slightly.
Just keep both end faces of leg extrusions selected and repeat extrusions and diameter adjustments until you reach the heel of legs. Put some extra cross-sections into the knee area, to allow knee bending and better control of surface detail. Feel free to use your imagination here! Learning the keyboard modifiers, such as the Ctrl-drag for extrusion, takes some practicing before it feels easy, but once you learn it, you can change the model this way efficiently. The handles are loaded with all kind of useful functionality, which you can access very quickly.
Select the faces behind the leg ends and extrude the heels (Ctrl-drag a normal handle) backwards. Then extrude first foot sections using the two opposite faces. Remember that you can build both legs at the same time, just by keeping the respective face handle selections on both legs.
Increase the foot diameter by dragging the end knob of a face handle. Then make the faces flatter (lower) by Shift-dragging a vertical edge. To summarize edge drag operations we have used so far: plain dragging moves, shift dragging scales and alt-dragging rotates.
Now its time to extrude some toes. Use the compass menu to switch to the edge edit mode. Click an edge at the top of a foot extrusion. Then Shift click the remaining 3 horizontal edges at the end of the foot extrusions, to add them to the selection.
The second row of the toolbar contains a tool icon Split E. Press the icon. Enter 3 to the Splits field and click OK. Use the compass menu to activate 'edit points'. Click the first split point on the top edge of the left foot to select it, then Shift click the corresponding point below. Now a point pair is selected and you can apply the Add tool of the second toolbar row to create a vertical connecting edge.
Select the next point pair and apply Add. Do this until all edge point pairs are connected. These steps prepare 4 new faces per foot, each one suitable for branching out a toe for Harry.
Open the view compass and select 'edit faces' mode. Click the leftmost base face of a toe to select it. Then shift click the remaining 7 toe faces to multi select them all. Next we will extrude toes. However, since we are extruding connected faces, we need to specify some additional options. So, instead of Ctrl-dragging face normals, activate the 'Extrude' tool from the second row of the toolbar. The toolbar changes to show the extrude tool options. Set the Region selector to Separately. Click anywhere on the view window, move the mouse and click again when the toe extrusion length is about one half of the full toe.
Shrink toe diameters using a red end knob of a face normal, and then extrude a new thicker section out. Again, you can build all 8 toes at the same time. If toes start to overlap, you can move them apart by dragging horizontal edges of selected faces. The final foot is shown below.
Modeling the beak and mouth takes some simple extrusions as shown in the pictures below. Use the normal handle with the Ctrl modifier to perform them easily. Note that the extrude operation works also inwards - you can create the mouth with it.
The figures show a very simple mouth construction, but feel free to put some additional geometry detail to the mouth area. This can be done, for example, by splitting the mouth edges and connecting the new points to the surrounding vertices. The more geometry there is, the more flexible expressions the mouth can show. The two 'horns' or 'eye arms' are extruded from the head. First select the two faces on both sides of the head as follows:
Then press the Ctrl key down and drag the outer end knob of a face normal handle. Ctrl dragging the end knob does something similar to the extrude operation, except that now the new face appears inside the original one. This way you can set up a smaller area for the actual horn branching.
The remaining modeling steps for horns are just applying extrusion and diameter scaling repeatedly - see the leg modeling instructions above. Add enough cross sections to horns so that you can later bend them in a flexible way and set up interesting poses. One cross section in the middle already allows bending, but with 2 or 3 cross sections more you can achieve multiple 'S' like bends. At the end of the horns, you should extrude little cup like nests for the eyeballs.
Now the actual body mesh is ready. Fine tune the shape using point, edge and face handles if you like. Then turn edit mode off by selecting 'object' editing from the compass menu (it's the compass selection straight to the left). You can also hit the spacebar to toggle edit mode on/off. To model the eyeballs, switch to the Analytic tab of the toolbar and activate the Sphere tool. Analytic sphere is a very simple and efficient way to model the eyes.
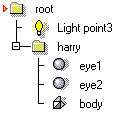
Hit the blue 'N' icon in the view control bar at the right edge of the screen to get a straight front view. Click in the middle position of the left eyeball. Then move the mouse, and click again when the size is suitable. Then select 'Edit/Duplicate' from the pull down menu, or press Ctrl + d to make a duplicate sphere. Hit 'm' key to activate the move tool. Click the first eye to start moving, move the mouse until the duplicate sphere is located in the proper position in the second horn and click again to finish moving. Take a top view by hitting the camera like icon above the reset icon 'N' in the view control bar. Make sure that the eyeballs are in the middle of the horn also in Z direction. If not, apply the move tool again. Now the eyes are ready. Let's clean up the hierarchy a bit. Select the body mesh called subdivXX, click the RMB and select Rename from the popup menu. Change the name to 'body' and hit Enter. Select the first sphere and rename it as 'eye1', then rename the second sphere as 'eye2'. Multi-select all three objects (for example: first click the body, then Shift-click eye1 and eye2 on the select window), click the RMB and select the tool Drop to a level from the popup menu. This creates a new hierarchy level, which includes the three objects. Rename the level as 'Harry'. Now we have a clean, simple structure for the character with easily recognizable component names. Organizing and naming the scene parts carefully is a useful modeling practice, and essential in managing complex scenes.
The body is now ready. Save the project again.
|
 |
 |


